When creating a new ArcGIS Pro project, you will have the option to change the project's settings, including selecting a default folder location on your computer (or in Amazon AppStream) for your project, geodatabase, and associated files.
You can also establish new folder connections for existing projects. This is helpful if you want to access files that have saved in another folder or directory on your computer.
Add a connection via the Insert tab

Add a Connection via the Catalog pane

In the Catalog pane, right-click Folders.
Select Add Folder Connection.
Navigate to the folder where you've saved your files to establish a new folder connection.
To add the plat map data to your ArcGIS Pro project, you can:
You can also add data via the Catalog pane:
Preparing and cleaning data sets for analysis can be one of the most time consuming tasks when working on a GIS project. Data cleanup can be performed in a number of ways. Some users opt to perform all of their data cleanup in tools like Excel or OpenRefine. Others use built-in tools within ArcGIS Pro or programming languages (e.g., Python, R) to clean their data.
ArcGIS Pro includes a number of built-in data engineering and geoprocessing tools that let you review, edit, and clean messy data sets to help streamline workflows and ensure more accurate analyses.
ArcGIS Pro provides an editing pane if you want to create new features, edit existing features, standalone tables, etc. You will want to start an editing session any time you create or edit data in ArcGIS Pro. This will provide you with added security in the event you make a mistake and need to cancel your changes. Changes made in an editing session are temporary until you save your changes and stop the session. If you add / edit data in ArcGIS Pro outside of an editing session, the changes that you make are permanent.
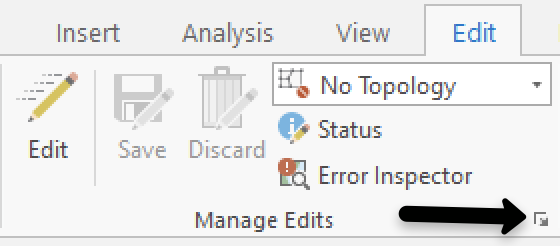
The edit button doesn't initially display in the ArcGIS Pro menu bar. You can change this setting by completing the following steps:
Go to the Edit tab in the ArcGIS Pro menu bar.
Click the Editing Options icon located in the lower-right corner of the Manage Edits group.
In the Editing Options window, scroll down to the Session settings. Click the Enable and disable editing from the Edit tab checkbox. Click OK to close the Editing options window.
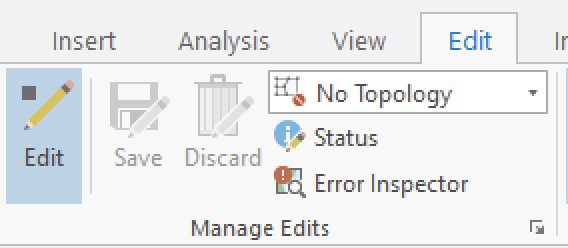
The Edit button will now appear in the ArcGIS Pro menu bar. Highlight the map layer you want to edit in the Contents pane, then click Edit to start an editing session.